
Here in this article, we try to cover the complete troubleshooting guide for Samsung hardware. So that our user got the overall idea of the ‘Hardware‘ of Samsung Galaxy smartphones.
And to manage applications with your device, users need to be clear on many more aspects so that they are not stuck at one point or if they facing a problem then they have something to go through.
And therefore keeping the same thought in mind, we bring this guide which provides steps to recognise and resolve ‘Backup & Restore’ related issues of Samsung devices. As this article is a troubleshooting guide so here we only discuss Hardware related tips and tricks, and for this, we categorize the whole guide into sub-steps for better understanding which are as follows:
- Do you hear a small noise from the inside of the device when shaking your Galaxy phone?
- Steps to activate eSIM on my Galaxy Z Fold 2.
- Why earphones and a charger plug are not included as in-box items.
- Steps to improve durability with the Galaxy Z Fold3 or Galaxy Z Flip3.
- Steps to couple a newly purchased earbud and a used earbud.
- Make sure that the protective vinyl on your new Galaxy phone is completely removed.
- What does IPX8-rated water resistance mean for my Galaxy Z Fold3 or Galaxy Z Flip3?
- What to do if- your Galaxy phone’s touch screen doesn’t work properly.
- What to do when a Samsung phone is not recognizing fingerprints.
- What to do when your Galaxy S pen does not recognize input on certain areas of the screen.
- What to do when your phone heats up.
- Will device NFC work if equipped with the LED cover?
Now, follow the below steps in order to understand each of these tips & tricks. Also, I would recommend that, before proceeding with the below steps, be sure that all devices’ software and related apps are updated to their latest version.
To update your mobile device’s software, follow these steps:
Step 1. Go to Settings > Software update.
Step 2. Tap on Download and install.
Step 3. Follow the on-screen instructions.
Do you hear a small noise from the inside of the device when shaking your Galaxy phone?
Sometimes we often wonder to hear a sort of rattling noise when we shake our Galaxy phone, though there’s nothing to worry about as your phone is absolutely fine, here we describe why this is happening.
The OIS (Optical Image Stabilization) feature may make a small sound inside of the device
In the Galaxy mobile phone, there is a component that functions as OIS (Optical Image Stabilization) whose function is to minimise shaking when taking pictures with the camera. If this small part is shaken while the camera is not operated, it may hit the internal structure and make a slight rattling sound.


One of the vital roles of OIS (Optical Image Stabilization) is a function that detects handshaking and corrects the lens by moving the lens in the opposite direction of the shake. Due to the different OIS sizes for each product, the sound may be relatively loud depending on the product. This is due to the characteristics of the OIS and it is not a product defect. Also notice that the sound does not affect the function and performance of the mobile phone.
What can OIS (Optical Image Stabilization) do?
Samsung’s Optical Image Stabilization uses a combination of hardware and software processing that is advanced enough to deliver clear and sharp photos even in low light, thanks to the big sensor on the Galaxy S and Note series. The multi-camera system offers dual OIS for steady shots whether you’re using the wide-angle or the tele-camera. So almost any time of day, your photos will come out as vividly as you remember the moment.
Note: The availability of this feature may vary by device and model.
Steps to activate eSIM on my Galaxy Z Fold 2
Your device includes an eSIM that works like a SIM card. You can use the mobile network after activating the eSIM or installing a nano-SIM card.
You can also activate eSIM and install a nano-SIM card so you can have two phone numbers or service providers for a single device.
Note: In some areas, data transfer speeds may be slower when two SIM cards are inserted into the device than when one SIM card is inserted.
How to configure the eSIM?
To activate eSIM, open Settings and touch Connections> SIM card manager> Add mobile plan.
-Go to Settings
– Connections
– SIM card manager
– Add mobile plan
When you find a mobile plan, follow the onscreen instructions to activate eSIM. If you have a QR code provided by your service provider, go to Settings > Connections > SIM card manager > Add mobile plan > Add using QR code, and then scan the QR code.
Note: This function may not be available depending on the region or service provider, including countries such as Guatemala, Ecuador, Costa Rica, Dominican Republic, Honduras, Venezuela, Panama, Jamaica, El Salvador, Nicaragua, Caribbean, Trinidad & Tobago, Puerto Rico.
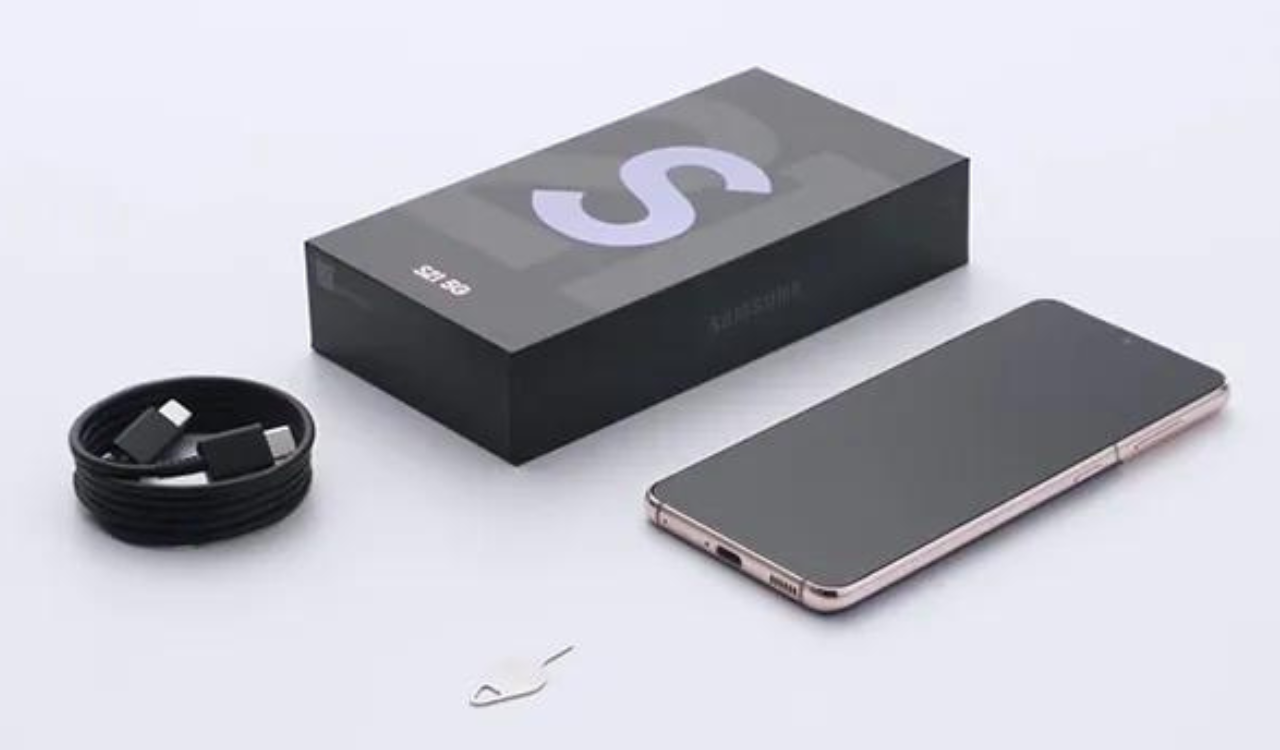
Reason to not include earphones and a charger plug inside the box items
The Galaxy S21 series does not have earphones or a charger plug in the box. As earphones are not included with the purchase of your Galaxy phone, you should purchase compatible earphones or a charger separately if necessary. In-box items may vary depending on the model and region in which you purchase.
If you want to detailed description then please refer to this article which I exclusively made on this topic: Why isn’t Samsung including Charger plug inside the box – SamNews 24
Also, I would recommend that, before proceeding with the below steps, be sure that all devices’ software and related apps are updated to their latest version.
To update your mobile device’s software, follow these steps:
Step 1. Go to Settings > Software update.
Step 2. Tap on Download and install.
Step 3. Follow the on-screen instructions.
Some reasons to not include the charger as given below:
- Samsung discovered that many Galaxy users are reusing their earphones and chargers that they already have at home even after purchasing a new phone. Our past models already have standardized chargers, and these chargers are widely available at home.
- Samsung also applied a standardized, USB-C type charging port in 2017, so older chargers are still compatible with our newest Galaxy models. In addition, Samsung wanted to reflect the recent wireless earphone usage trend.
- Reflecting these usage patterns of customers, Samsung reviewed the composition of the products from various perspectives and is transitioning to the removal of a charger plug and earphones in our latest line of Galaxy smartphones.
- They also believe that the gradual removal of charger plugs and earphones from our in-box device packaging can help address the growing e-waste problem and remove any pressure that consumers may feel towards continually purchasing new chargers with new phones.
- Since they trying to eliminate unnecessary waste of resources by prioritizing compatibility between product components, and through these, Samsung is committed to providing the best possible experiences for our Galaxy customers.
Note:
- In-box items vary depending on the model you purchase, or the country or region you live in.
- Charger plugs are sold separately, and the price may vary by market.
Compatible earphones and chargers
The latest models from the Galaxy S21 series do not come with earphones or a charger plug (power adapter) by default, but if necessary, you can purchase them separately.
USB Type-C wired earphones that support digital output or wireless earphones such as Galaxy Buds, Buds+, Buds Live, Buds Pro, and Buds2 can be used with the latest phones.
Note:
- To use the 3.5pi earphones, you need the USB Type-C to 3.5pi earphone adaptor sold separately. Plug the adaptor into your phone first, and then connect the earphones to your phone.
- The device may not be compatible with earphones that use a different audio output method or were made by a different manufacturer.
- As some USB Type-C earphones and USB Type-C adapters may not be compatible with your phone and some features may not work properly, make sure they are compatible with your phone before purchase.
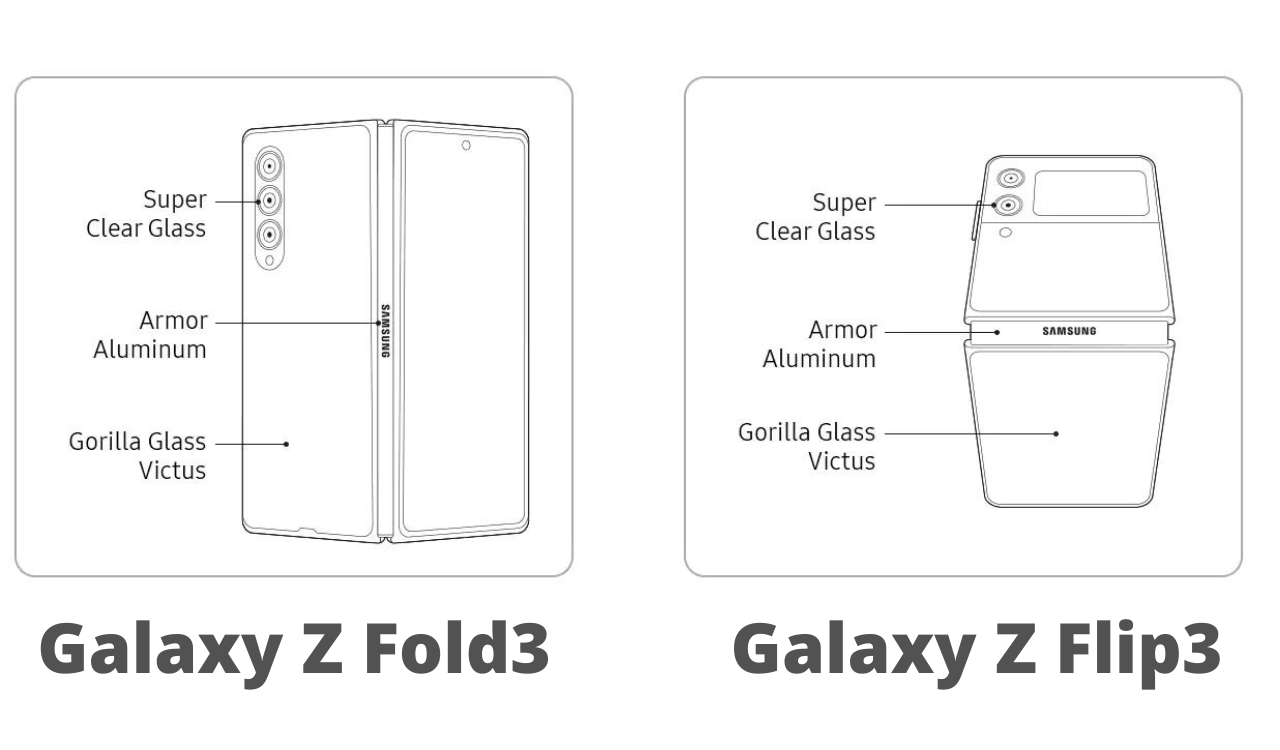
How has durability improved with the Galaxy Z Fold3 or Galaxy Z Flip3?
The Galaxy Z Fold3 or Galaxy Z Flip3 are first-ever foldable smartphones with IPX8-rated water resistance. Enhanced durability has been applied to Galaxy Z Fold3 and Galaxy Z Flip3 with add-ons like Armor Aluminum on the frame and hinge as well as Gorilla Glass Victus on the cover display and back cover. Ultra Thin Glass and a new PET protection film to make your display more durable.
Find out more on the Galaxy Z Fold3 and Galaxy Z Flip3’s enhanced durability. Check out the enhancement that Samsung has done as per their generations:
1st Generation (Galaxy Z Fold)
- Samsung’s first-ever foldable smartphone.
2nd Generation (Galaxy Z Fold2 / Z Flip)
- First-ever foldable.
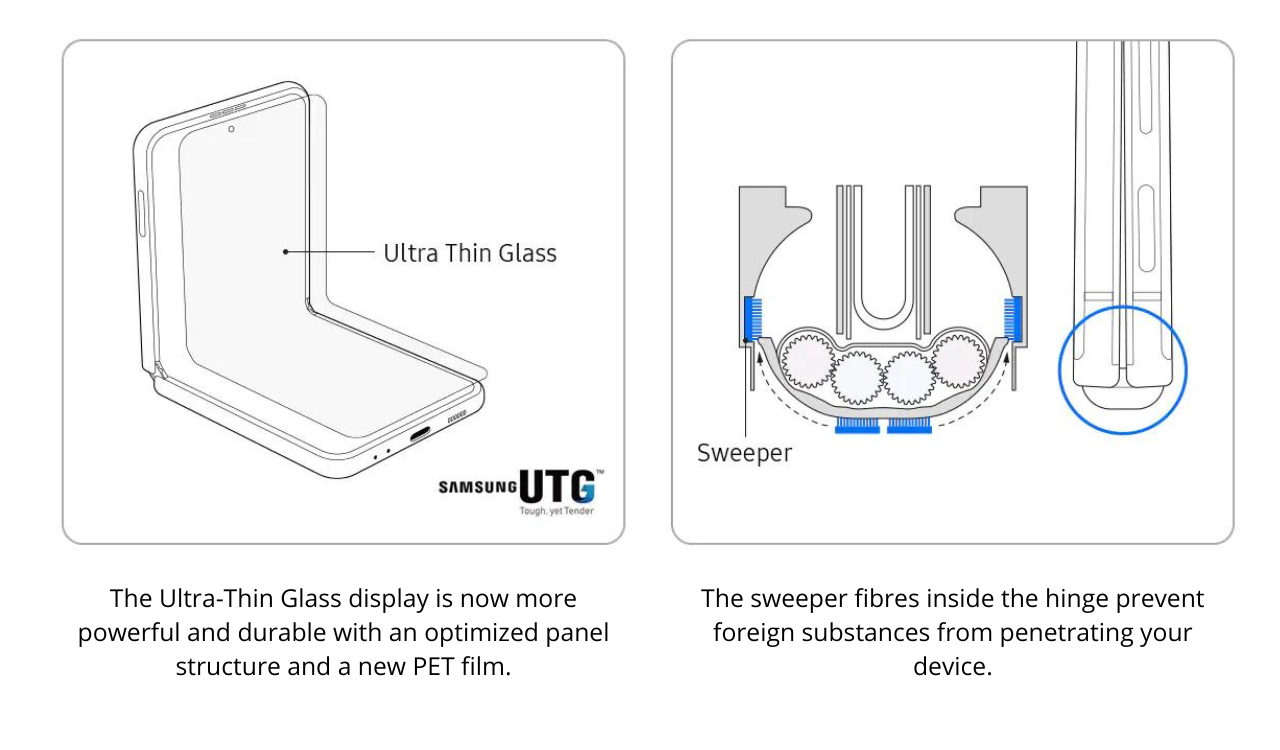
- Ultra Thin Glass (UTG).
- Hideaway Hinge.
3rd Generation (Galaxy Z Fold3 / Z Flip 3)
- Stronger body with Armor Aluminum Frame.
- Durable and scratch-resistant display with Gorilla Glass Victus.
Note:
- Galaxy Z Fold3 and Galaxy Z Filp3 devices are water-resistant (IPX8) but are not dust-resistant.
- It’s recommended to keep your devices away from sand or other small particles.
- Figures related to the increased durability of the Galaxy Z Fold3 and Galaxy Z Flip3 are based on internal test results compared to the previous foldable models.
How durable are the Galaxy Z Fold3 or Galaxy Z Flip3?
The frames and hinges on both phones use Armor Aluminum which is more durable and stronger compared to previous foldable models. The Gorilla Glass Victus on the back and front have made the phones much less prone to scratches. Also, the Super Clear Glass has been placed over your rear camera deco to make the lens scratch-resistant and anti-reflective.
How sturdy are the display and hinges on the Galaxy Z Fold3 or Galaxy Z Flip3?
With the Infinity Flex Display, the Galaxy Z Fold3 and Galaxy Z Flip3 can withstand over 200,000 folds. Moreover, the sweeper fibres in the hinge prevent foreign substances such as dust from entering your device.
- Lasting 200,000 folds in testing means the hinge can withstand 100 folds a day for 5 years. The lifespan has been measured according to Samsung’s quality standards.
- Applying too much pressure or pressing with a sharp object may cause damage to your device. Please be careful not to put excessive force on the area where the screen folds, especially when the device is not fully opened.
- The device models are not dust-resistant. Please take care not to let foreign substances or liquids penetrate the device. Keep your device away from dust, foreign substances, moisture, and water (e.g., the beach, muddy terrain, swimming pool, showers, etc.).
- 200,000 fold test was performed under certain temperature conditions. The 200,000-fold life cycle is not guaranteed under other conditions.
- Hinges applied with sweeper fibres decrease the influx of foreign substances, however, they do not guarantee dust resistance.
There is a crease where the screen folds. Is it a sign of a faulty device?
The Galaxy Z Fold3 and Galaxy Z Flip3 used multiple layers of thinner films to provide additional protection on the display. With this increased durability, however, you may notice a crease at the centre of the screen. The current film material is still prone to deformation. Various research is in progress to reduce the limitations of the material. Creases do not hinder device performance, though. Thus, it is not a sign of a faulty device.
Now the features like PET film, Anti-Fouling and Anti-Fingerprint are described below:
- The foldable displays feature a PET film that further enhances durability. It is recommended to use the protective film attached. When the film is detached, it is recommended to visit an authorized service centre.
- Anti-Fouling and Anti-Fingerprint coating have been applied on top of the protective film. It is optimized for the Galaxy Z Fold3 and has undergone extensive testing.
Note:
- Please avoid putting excessive force with sharp tools as it may cause scratches or dents or placing objects such as cards, coins, or keys in between the screens, as may damage the screen.
- Do not remove the protective film of the main display as it can leave your phone screen damaged.
How to couple a newly purchased earbud and a used earbud
Even if you lost one of the earbuds set, you don’t have to buy a new set of earbuds again. Buy one earbud separately and couple it with the remaining one, and you can use them together as a pair again.
Now, follow the below steps in order to understand each of these tips & tricks. Also, I would recommend that, before proceeding with the below steps, be sure that all devices’ software and related apps are updated to their latest version.
To update your mobile device’s software, follow these steps:
Step 1. Go to Settings > Software update.
Step 2. Tap on Download and install.
Step 3. Follow the on-screen instructions.
How to sync the earbuds to each other
If you recently damaged or lost one of your earbuds set and bought a replacement, you can easily connect the previously used earbud to the newly purchased earbud. Coupling is required to adjust the volume and delay between both earbuds. Follow the steps below to self-couple your earbuds.
Step 1. Check the direction of each earbud, the newly purchased earbud and the previously used earbud, and correctly insert them into their corresponding slots in the charging case.
Step 2. Touch and hold both earbuds’ touch areas for 7 seconds or more. The earbud battery indicator light will flash green and turn off. Then, the earbuds are coupled.
Step 3. When the earbuds are coupled, you will be able to reconnect to your compatible devices.
Note: The battery indicator on the charging case will keep flashing red when the earbuds are not coupled properly. Remove the earbuds from the charging case and insert them again. Then, touch and hold both earbuds for seven seconds or more.
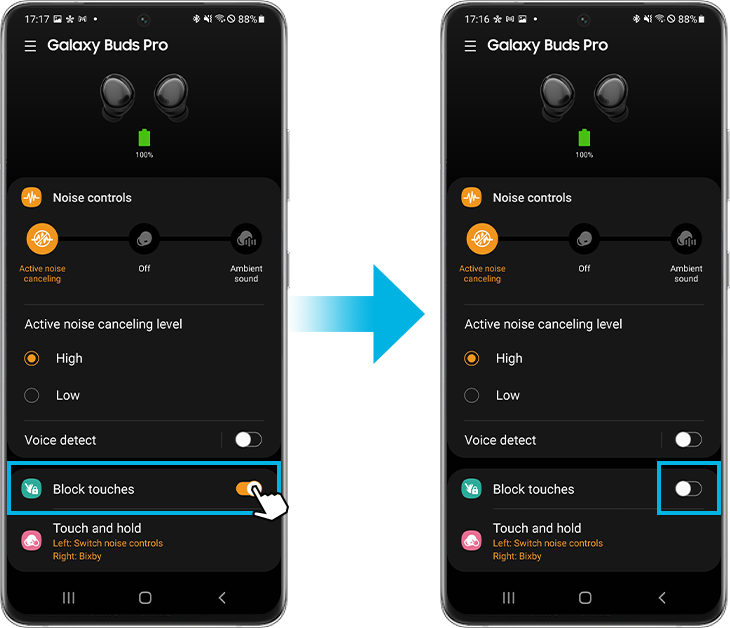

Additional Tip for self-coupling your earbuds
If you cannot complete coupling with a new earbud, make sure the Block touches feature of the previously used earbuds was disabled on the Galaxy Wearable app. Try disabling Block touches by following the steps below.
Step 1. Open the Galaxy Wearable app.
Step 2. Tap the switch to disable Block touches.
Note:
- If you lost an earbud but still want to use the other one by itself, you can use the single earbud with the device it was previously paired to. However, some features may be unavailable.
- Device screenshots and menus may vary depending on the device model and software version.
Make sure that the protective vinyl on your new Galaxy phone is completely removed
Your new Galaxy phone may be covered with protective vinyl or film to protect your device during production and distribution. If you use the device without removing the protective vinyl after purchasing the device, various problems may occur. So it is recommended that you remove all of the protective vinyl before using it.
It is recommended that, before proceeding with the below steps, be sure that all devices’ software and related apps are updated to their latest version.
To update your mobile device’s software, follow these steps:
Step 1. Go to Settings > Software update.
Step 2. Tap on Download and install.
Step 3. Follow the on-screen instructions.
Remove the initial protective vinyl completely
To protect your Galaxy phone, while the device is manufactured and distributed from the factory, the front, rear, camera, and side parts of the device are covered with protective vinyl. This protective vinyl attaches directly to the device, mainly to the charging hole, microphones, speaker holes, and cameras. In the case of the microphone hole at the bottom specifically, a large protective vinyl and a small sticker may be attached in two layers, so even the second small sticker must be completely removed.
If you don’t hear the receiving or outgoing sound clearly or the sound is erratically cut off, it may be because the protective vinyl that was attached to the speaker and microphone holes on the device is blocking the holes. In addition, if the protective vinyl attached to the camera is not removed, the picture may be out of focus or cause angle distortion when you take a picture, and you may have a picture with degraded quality.
Note: A third-party phone protector or accessory that completely covers the phone can also interfere with microphone performance.
What does IPX8-rated water resistance mean for my Galaxy Z Fold3 or Galaxy Z Flip3?
Here are some tips on how to keep your Galaxy Z Fold3 and Galaxy Z Flip3 devices in the best condition possible. They are the world’s first water-resistant foldable smartphones. An IPX8 rating means you can unfold the phone freely, even when caught in the rain. However, it doesn’t mean that they are dust-resistant.
Follow these important tips outlined listed below, so your foldable device will continue looking and performing great.
Now supports IPX8 water resistance
Galaxy Z Fold3 and Galaxy Z Flip3 devices both support IPX8 water resistance. The devices have been tested in controlled settings and have been proven to be water resistant in certain situations. (International standard IEC 60529, IPX8 product, test conditions: 15-35 ℃, 86-106 kPa, fresh water, up to 1.5 m, up to 30 minutes).
For proper water resistance, please be aware of the following instructions. Failure to heed the instructions below may affect your device’s performance and appearance.
Dos
- The Galaxy Z Fold3 and Galaxy Z Flip3 are water resistant and can withstand the rain if left in outdoor situations for a while, such as camping.
- When dirty or smeared, you may clean your device with fresh water.
- As your device is water resistant, it can withstand spills of fresh water from the kitchen or under other ordinary circumstances.
Don’ts
- When the microphone or speaker is wet, It is not recommended use it as audio sound may be muffled and affect the clarity during a call. Wait until the device is completely dry before use.
- If the icon shown in the image is displayed when charging, we recommend disconnecting your device from the charger as there is moisture in the charging port. Wait until the device is completely dry before use.
- If the device is dropped or damaged, the water-resistant features of the device may be damaged.
Please be wary of foreign substances or dust
The Galaxy Z Fold3 and Galaxy Z Flip3 are water-resistant (IPX8), but they are not dust-resistant. Exposure to small particles or any liquid other than fresh water may cause scratches, dents, and other types of damage to the screen and the device. Therefore it is recommended to refrain from using the device in environments where foreign substances such as dust, water, and moisture are to be expected.
We advise using precautionary measures to prevent an influx of substances other than freshwater, refer below points:
- Do not drop the phone in salt water. If you do so, when it dries, salt may accumulate and block the primary microphone, earpiece, or external speaker.
- When using your device on the beach, near a construction site, or in other situations where it can easily be exposed to foreign substances, please be aware that any penetration of foreign substances may damage your device.
Take the following steps when your device is immersed in water
Follow the steps below according to the different situations of water penetration. After following these steps, make sure the device is completely dry before use. If the device is still not working even after the device has been completely dried, it is recommended to have the device inspected and repaired through the authorized service centre.
What to do when your device is exposed to fresh water
STEP 1. Dry your phone thoroughly with a clean, soft cloth.
STEP 2. Dry the device thoroughly in a cool setting, preferably one that is well ventilated and not under extreme light.
What to do when your device is exposed to liquids other than freshwater
If your device has been exposed to liquids other than fresh water (e.g., salt water, chlorinated pool water, soapy water, oil, perfume, sunscreen, hand sanitizer, cosmetics, etc.), please follow the steps below. Swipe or click to see each step.
STEP 1. Turn the phone off and submerge it in fresh water for 1~3 minutes.
STEP 2. Dry it thoroughly with a clean, soft cloth.
STEP 3. If you cannot visit a service centre right away, dry the device thoroughly in a cool setting, preferably one that is well ventilated and not under extreme light.
Note:
- Avoid drying your device with a hair dryer as it may cause additional damage due to the heat.
- If you spill a drink/alcoholic drink/coffee on your device, simply clean it with fresh water. However, spilling hot or sticky liquids on your device may cause additional damage.
- IPX8 water resistance is supported on your device, which means your device will function properly even after being submerged in fresh water for up to 30 minutes under specific conditions (15~35 ℃, 86-106 kPa, up to 1.5m depth).
- Water resistance is only guaranteed under the IPX8-rated water resistance conditions. If your device becomes sullied, wash with a clean cloth before use. If further issues arise, it is recommended that you visit an authorized service centre for assistance.
- At our service centres, we use our testing tools to check if the water resistance function is working under the IPX8 conditions. If it is properly working, we diagnose that the problem occurred because the user was using the device under conditions that exceeded the IPX8 rating. On the contrary, if it is found that your device’s water resistance function is not working properly, you are subject to free repairs within the warranty period.
- Please be aware that the water resistance function of your device may be limited when exposed to the water below 15℃, above 35℃, or under other situations not guaranteed by Samsung.
- Any repaired devices are tested again against the standards of a new device’s water and dust resistance values by applying the same test algorithm at all our Samsung service centres. This process guarantees that the repaired device performs identically to a new one.
What to do if- your Galaxy phones touch screen doesn’t work properly
If the touchscreen on your Galaxy phone is not sensitive enough or responds intermittently, see the guide below.
It is recommended that, before proceeding with the below steps, be sure that all devices’ software and related apps are updated to their latest version.
To update your mobile device’s software, follow these steps:
Step 1. Go to Settings > Software update.
Step 2. Tap on Download and install.
Step 3. Follow the on-screen instructions.
Case 1. Accessories can affect the touch sensitivity of the screen
If you attach accessories, such as screen protectors, to the touch screen, it may not work properly. Protective lenses can also affect sensitivity to touch. In particular, some non-Samsung-approved protective films or lenses only have adhesive on the side edges, and if these products adhere to the screen, the glass or protective film may not fully adhere to the screen.
Because of this, some areas of the touch screen may not recognize the touch and respond intermittently. After removing the accessory, check the touch function again. If the accessory is removed and the touch is working properly, your phone will have no problem with the touch screen.
Note: Samsung-approved accessories are recommended. The use of unapproved accessories can cause performance problems.
Case 2. Be careful when touching the screen
If you are wearing gloves or your hands are not clean while touching the touch screen, or if you touch the screen with sharp objects or your fingertips, the touch screen may not work properly
Case 3. Moisture can affect the touch screen
The touch screen may malfunction in wet conditions or when exposed to water.
Case 4. Activate the touch sensitivity function
If you have difficulties with your Samsung mobile phones, tablets or portable devices, you can send us a question in the Samsung Members application.
What to do when your Galaxy S pen does not recognize input on certain areas of the screen
Some users may think an error has occurred if the Galaxy S21 Ultra does not recognize S Pen input and does not respond. Here are some useful tips for the common issues that may arise with S Pen and how to troubleshoot these problems.
It is recommended that, before proceeding with the below steps, be sure that all devices’ software and related apps are updated to their latest version.
To update your mobile device’s software, follow these steps:
Step 1. Go to Settings > Software update.
Step 2. Tap on Download and install.
Step 3. Follow the on-screen instructions.
Check 1. Attached are cases or covers with magnetic material for a device
Any third-party cases with magnetic closures or clasps can cause interference with S Pen recognition. If a magnetic case or cover is attached to the device, it is recommended to remove the attached case or cover and try again.
Check 2. S Pen may not work due to a magnetic force
If you use the S Pen in certain affected by magnetic force, the S Pen may not work.
Check 3. A screen protector can cause the S Pen issue
Screen protectors can cause inconsistent motion and pressure when using the S Pen. If the screen protector on your Galaxy S21 Ultra has the following issues, it is recommended to remove the screen protector.
- Too hard or rubbery surface for writing.
- An uneven surface affects consistency.
- The thickness of a screen protector can affect the screen sensitivity.
- A dirty or old screen protector can affect performance.
Note:
- If you use the S Pen at sharp angles anywhere on the screen, the device may not recognize the S Pen’s actions.
- Device screenshots and menus may vary depending on the device model and software version.
What to do when your phone heats up
If your Galaxy phone may get hot while you are using the device, but it has been noticed that normal heating will not affect the life or performance of the device. But at the same time, if you start to feel uncomfortable due to possible overheating of the device, you should stop using the device and cool it down first. See the guide below to help keep your phone at a normal temperature.
Since it is recommended that, before proceeding with the below steps, be sure that all devices’ software and related apps are updated to their latest version.
Therefore to update your mobile device’s software, follow these steps:
Step 1. Go to Settings > Software update.
Step 2. Tap on Download and install.
Step 3. Follow the on-screen instructions.
Factors that may cause your phone to heat up
If your Galaxy phone gets warm during use, there are several reasons this may be the case. When you use features or apps that require more power or use them for extended periods, your device may temporarily heat up due to increased battery consumption. Also, during wireless charging or fast charging, your phone may feel warmer to the touch. The following are examples of situations in which the device may overheat. Depending on the functions and apps you use, these examples may not apply to your model.
- During the initial setup after purchase or when restoring data.
- When downloading large files.
- When using apps that require more power or using apps for extended periods.
- While multitasking or when running many apps in the background.
- When using a large amount of data for syncing with the cloud, email, or other accounts.
- When the device is placed in direct sunlight.
- When using the mobile hotspot and tethering feature.
- When using the device in areas with weak signals or no reception.
- When charging the battery with a damaged USB cable.
- When the device’s multipurpose jack is damaged or exposed to foreign materials, such as liquid, dust, metal powder, or pencil lead.
- When you are roaming.
Note: Results and symptoms may vary depending on the device and model being used. Some solutions will not apply to certain devices.
Do the following when the device heats up
Methods to check if you feel your phone gets hot, Refer to the below steps to try and cool down your phone:
- Keep the device updated with the latest software.
- Conflicts between running apps may cause the device to heat up. Restart the device.
- Deactivate the Wi-Fi, GPS, and Bluetooth features when not using them.
- Close apps that increase battery consumption or that run in the background when not in use.
- Delete unnecessary files or unused apps.
- Decrease the screen brightness.
- If the device overheats or feels hot for a prolonged period, do not use it for a while.
- A higher refresh rate results in smoother animations and scrolling but uses more power. Set the refresh rate to Standard mode.
- If you’re charging the battery, disconnect the charger from the device and close any running apps. Wait for the device to cool down and then begin charging the device again.
- When using a wireless charger, do not place foreign materials, such as metal objects, magnets, or magnetic stripe cards, between the device and the wireless charger.
Precautions for device overheating
If you begin to feel uncomfortable due to the device overheating, stop using the device. When the device heats up, the features and performance may be limited or the device may turn off to cool down. The feature is only available on supported models.
- If the device overheats or reaches a certain temperature, a warning message will appear to prevent device failure, skin irritations and damage, and battery leakage. To lower the device’s temperature, the screen brightness and the performance speed will be limited and battery charging will stop. Running apps will be closed and all calling and other features will be limited, except for emergency calls, until the device cools down.
- If a second message appears due to a further increase in the device’s temperature, the device will turn off. Do not use the device until the device’s temperature drops below the specified level. If the second warning message appears during an emergency call, the call will not be disconnected by a forced shutdown.
Note: Warning message may vary by device model.
Precautions for the operating environment
Your foldable phone may heat up due to the environment in the following conditions. Use caution to avoid shortening the battery’s lifespan, damaging the device, or causing a fire.
- Do not store your device in very cold or very hot temperatures.
- Do not expose your device to direct sunlight for extended periods.
- Do not use or store your device for extended periods in very hot areas, such as inside a car in the summertime.
- Do not place the device in any areas that may overheat, such as on an electric heating mat.
- Do not store your device near or in heaters, microwaves, hot cooking equipment, or high-pressure containers.
- Do not use a cable with the covering peeled off or damaged, and do not use any charger or battery that is damaged or malfunctioning.
Note: Device screenshots and menu may vary depending on the device model and software version.
Will device NFC work if equipped with the LED cover?
NFC may not be available while being activated LED light of LED cover. Genuine Samsung LED cover is largely divided into LED view cover (back protection & screen cover type, LED function is on the screen cover) and LED back cover (LED function is on the rear case), and NFC use may be temporarily restricted for LED view cover.
Before proceeding with the below steps, be sure that all devices’ software and related apps are updated to their latest version.
Follow the below steps to update the software:
Step 1. Go to Settings > Software update.
Step 2. Tap on Download and install.
Step 3. Follow the on-screen instructions.
LED cover features
When using Light control, you cannot read or write NFC tags or share data between NFC devices. According to the message that shows up when you turn on the LEDs of the case, “NFC isn’t available while using Light control”. It means that if the LED functionality of the cover is used, the NFC on your Galaxy phone will automatically be turned off. Therefore, you must turn off the Light control of the LED cover to use NFC. There is no LED back cover, and only while using the Light control function, the P2P function and the tag function of NFC cannot be used, so a pop-up message occurs.
- Mode lighting: When the Galaxy device is facing downwards, a light show is presented with the LEDs.
- LED notification icons: You will get notification icons on the back when a notification comes.
- Camera timer: If the timer for the rear camera is turned on, the countdown will be shown on both the screen and the cover.
- Emoticons for the rear cameras: When you open the camera app, and the rear cameras are active, a LED icon you chose will be shown on the back cover.
What is NFC?
NFC stands for “Near Field Communication” and, as the name implies, it enables short-range communication between compatible devices. This technology allows users to make secure transactions, exchange digital content, and connect electronic devices with a touch. Here transmissions are short range (from a touch to a few centimetres) and require the devices to be in close proximity.
NFC is the technology in contactless cards and the most common use of this is in your smartphone is making easy payments with Samsung Pay. It is used to quickly connect with wireless devices and transfer data.
How do I quickly turn NFC on and off?
Step 1. Swipe down from the top of the screen twice, to access your quick settings.
Step 2. Swipe left to see more options.
Step 3. Tap NFC to turn it on or off.
Join SAMNews 24 On Telegram For Instant Samsung Updates.